Visual Design of Dear Lord, Make Me Beautiful
Timeline: 06-12/2024
Category: Ballet, Multimedia Performance, Visual Design, UX/UI
Role: Visual Assistant, Projection Engineer
Tools & Technology: Unreal Engine, TouchDesigner, PyTorch, StyleGAN3
Venue: Park Avenue Armory, New York
Press Release: https://www.armoryonpark.org/programs_events/detail/dear_lord

Park Avenue Armory Marketing Cover
I collaborated with new media artist Cao Yuxi, choreographer and dancer Kyle Abraham, and yMusic ensemble to develop the visual design for the multimedia ballet Dear Lord, Make Me Beautiful at Park Avenue Armory in New York.
The performance explores the growing sensitivities of life and transition, and nature and humanity, in our chaotic world. The underlying choreography employs layers of counterpoint to find intimacy and evoke ideas of empathy and constant change, fueling an evocative new dance work that migrates through the fragility of time and an ever-changing ecology.


Rehearsal Photos
The stage features a rectangular drape with rounded edges at the bottom, with projection mapping applied. For the visual design, we aimed to create dynamic, "living" paintings that resonate with the themes of the work and allow real-time control. Particles were selected for their unique aesthetic and the Zen energy integral to the project. To achieve this, we decided to use AI-generated Chinese Shanshui paintings, transform them into particle systems in Unreal Engine, and develop an interactive panel for live control.
My role involved researching and summarizing applications of Deep Neural Networks using PyTorch, training the AI model with StyleGAN3, and collaborating on the development of the interactive cue system in TouchDesigner and Unreal Engine.
Here is my workflow:
1) Training Chinese Shanshui Painting AI Model (StyleGAN3)
To train the AI model for generating Chinese Shanshui paintings, I started by exploring online resources, including online courses on Deep Neural Networks and GitHub repositories such as StyleGAN2, StyleGAN2-ADA, and StyleGAN3. StyleGAN3 was chosen for its smooth and continuous image generation.
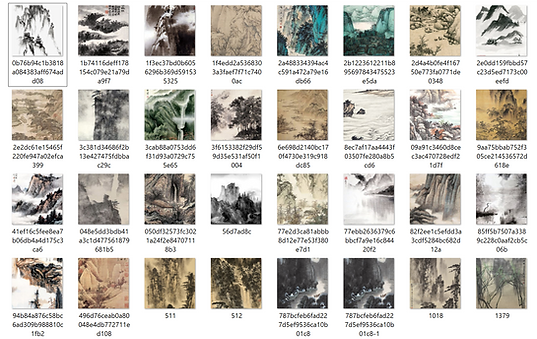
I was provided with 550 Chinese Shanshui painting images, which were insufficient for a complete dataset. To address this, I used an existing pre-trained landscape model (source: Landscape 256) as the foundation for further fine-tuning.
[1] Environment Setup
-
Install necessary tools:
Python, Anaconda, PyTorch, Visual Studio, and CUDA Toolkit.
-
Set up the coding environment using Anaconda:
conda create -n stylegan3 python=3.8
conda activate stylegan3
-
Missing dependencies can be installed with:
pip install <package-name>
[2] Dataset Preprocessing
The provided Shanshui images were preprocessed to meet training requirements:
-
Code for Resizing and Cropping Images to Squares:
from PIL import Image
import os
input_folder = r'path_to_input_images'
output_folder = r'path_to_output_images'
os.makedirs(output_folder, exist_ok=True)
for filename in os.listdir(input_folder):
if filename.endswith('.jpg') or filename.endswith('.png'):
image_path = os.path.join(input_folder, filename)
image = Image.open(image_path)
size = min(image.width, image.height)
left = (image.width - size) // 2
top = (image.height - size) // 2
right = left + size
bottom = top + size
square_image = image.crop((left, top, right, bottom))
output_path = os.path.join(output_folder, filename)
square_image.save(output_path)
-
Run the Preprocessing Script:
python preprocess.py
-
Convert to PyTorch-Compatible Format:
python dataset_tool.py --source="dataset path" --dest="destination path" --resolution=256x256
[3] Training the Model
Resuming the pre-trained landscape model with the processed dataset (trained for 4 days):
python train.py --outdir=~/training-runs --cfg=stylegan3-t --data=~/datasets/shanshui-256x256.zip --gpus=1 --batch=32 --gamma=32 --batch-gpu=4 --snap=5 --kimg=5000 --metrics=none --resume=pretrain model/lhg-256-stylegan3-t-25Mimg.pkl
[4] Generating Images and Videos
-
Generate Images:
python gen_images.py --outdir=out --trunc=1 --seeds=2 --network="pickle/model path"
-
Generate Videos:
python gen_video.py --output=lerp.mp4 --trunc=1 --seeds=0-31 --grid=4x2 --network="pickle/model path"
-
Using StylanGAN's interactive model visualization tool to generate animated videos:
python visualizer.py

Environment Setup in Anaconda
Dataset Preprocessing Output

StyleGAN Model Training Result
Generated Video

StyleGAN Visualizer
2) Transforming AI-Generated Videos in Controllable 3D Particles
Using Unreal Engine's Niagara system, we implemented a dynamic particle system based on AI-generated videos:
-
Setup
-
Add a directional light and a cineCameraActor. Adjust the directional light to create slight angles instead of direct lighting, adding depth and shadows to enhance visual appeal.
-
Create a Niagara system with a single emitter (Fig①). Set the emitter to "GPU Fixed" for GPU computation.
-
-
Custom Functions
-
Get Color and Position: Create a plane with a texture and sample random points on the plane to obtain their UV coordinates. Use the UV data to retrieve corresponding color information from the texture, determining both the position and color of the generated particles (Fig②).
-
Color Control for Speed: Introduce a custom variable, CurlStrength, to influence particle movement based on color intensity (Fig③). Modify the Niagara module "Curl Noise" by multiplying its final output force with CurlStrength (Fig④). Brighter colors exert greater force, creating a dynamic interaction between color and movement.
-
-
Niagara Parameters
-
Create a Material Parameter Collection (MPC) with all parameters for control (Fig⑤).
-
Set up a Niagara Parameter Collection (NPC) to read parameters from the MPC (Fig⑥).
-
Experiment and Finalize: In non-play mode, adjust NPC values for quick testing. During play mode, NPC synchronizes with MPC values for consistent control.
-
Adding a sparkle texture to the particle
-
-
Parameters Controlled by MPC (Fig⑦)
-
Curl Noise Offset
-
Life Time Max/Min
-
Linear Drag
-
Linear Force
-
Mesh Scale
-
Noise Frequency
-
Noise Strength
-


Visual Instruction (Fig ①-⑦) of Transforming AI-Generated Videos in Controllable 3D Particles in Unreal Engine

3D Particle Painting Result
3) Interactive Cue System
[1] Cue System 1.0 in TouchDesigner
The performance consists of 19 cues, each synchronized with specific music and dance movements. To ensure seamless integration, we developed an initial cue system in TouchDesigner.

Cue System in TouchDesigenr
According to the stage plan, we adjusted the visuals (prior to transforming them into particles) to fit the specified shape, ensuring the results aligned with the layout for seamless projection mapping tests.

Specific Shape for Projection Mapping (Programmed in TouchDesigenr)


Stage Plan of Dear Lord, Make Me Beautiful
There are 19 different containers, each containing visuals such as AI-generated Chinese Shanshui paintings and other optional theme-related images or videos. Within each container, effects for tilt and color adjustment are applied. A switch node connects them for smooth cue changes.

Example of Effects Programming in a Container
We marked each cue by frame and created a cue system using animation keyframes, including transition times. A simple panel was developed for early rehearsals and testing, allowing cues to be easily queued and played by clicking buttons.


Cue System 1.0 (Programed in TouchDesigner)
[2] Using NDI to Connect TouchDesigner with Unreal Engine
To transform TouchDesigner's output into particles within Unreal Engine, we used NDI for real-time video transmission:
-
Download the NDI Unreal Engine SDK from the official site: NDI Unreal Engine SDK.
-
Create an NDI Media Receiver in Unreal Engine. Specify the VideoTexture and the desired NDI source to receive the video output from TouchDesigner.
-
Add an NDI Receive Actor to the Level. Set the NDIMediaSource to the previously created NDI Media Receiver.
[3] Using OSC to Control Particle Movement
We used OSC (Open Sound Control) to control various particle parameters dynamically:
-
Download the OSC plugin from the OSC Plugin Overview and turn it on in Unreal Engine.
-
Create a new Blueprint to handle OSC messages and place it in the level.
-
Parse the received OSC data and map it to the Material Parameter Collection (MPC).
-
Feed the OSC-controlled parameters from the MPC into the Niagara system, enabling dynamic real-time adjustments of Niagara parameters.
[4] UX/UI Design of Cue System 2.0 in Unreal Engine
For the final cue playing system, we designed a UI panel with two playback options:
-
Video Sequence Playback: Pre-recorded videos of each cue.
-
NDI Playback: connect TouchDesigner feed for backup and rehearsals.
The system used UMG (Unreal Motion Graphics) for UI implementation.
-
Control Panel
To separate the UI and fullscreen visuals across two monitors, the system required two windows. This was achieved using the MultiWindow plugin and custom C++ code.

Final Look of the UI Panel
-
Sequencer Cues (Fig①)
-
Import Sources (MP4 files or image sequences)
-
Create a Media Player and corresponding Media Texture for each source. The texture is linked to buttons in the UI, allowing users to trigger visuals via the Niagara system.
-
Create a Level Sequence for each cue.
-
Add a Media Track to select the media source and texture.
-
Add a Material Parameter Collection (MPC) track to adjust particle parameters dynamically.
-
*Note: Avoid adding a Camera Track in sequences to prevent visual glitches when switching between cues. Instead, control the camera through the UMG Blueprint.
-
Cue Playback Logic
-
UI Setup:
-
In the UMG Blueprint, create a Level Sequence Array to organize all cues sequentially (e.g., 0, 1, 2...) (Fig②).
-
Users select a cue by clicking its button and pressing the Go button to start playback.
-
-
Cue Player Management (Fig③):
-
Destroy the current sequence player before creating a new one to avoid performance issues.
-
Use the current level sequence parameter to identify and play the selected cue.
-
Bind an event to destroy the sequence player upon playback completion.
-
-
Switching to NDI Playback:
-
Ensure the existing sequence player is destroyed before switching to NDI.
-
-
-
NDI Integration (Fig④)
-
Create a Game Mode and Player Controller, and apply them in the Project Settings.
-
Add an NDI Receiver Component to the Player Controller and link it to the preconfigured NDI Media Source.
-
The Player Controller enables operations such as playback, pause, and source switching for NDI.
-
-
Display Current Cue (Fig⑤)
-
Add a Text Component to the UI and bind it to show the currently playing cue.
-
Ensure proper handling of the isPlaying Boolean and playing level sequence parameters in the UMG Blueprint's button event logic.
-
-
Compiling the Executable File (Fig⑥)


Visual Instruction (Fig ①-⑥) of Developing the UI Panel in Unreal Engine
Cue Transitions
Premiere
December 3-14, 2024, Park Avenue Armory


Photo by Stephanie Berger, Courtesy of Park Avenue Armory.
Interview